Task 1: Creating Microsoft Purview Account
Task 2: Setting Custom DLP policies for Microsoft Copilot for Security
Task 3: Creating an alert in Microsoft Teams
Task 1: Creating Microsoft Purview Account
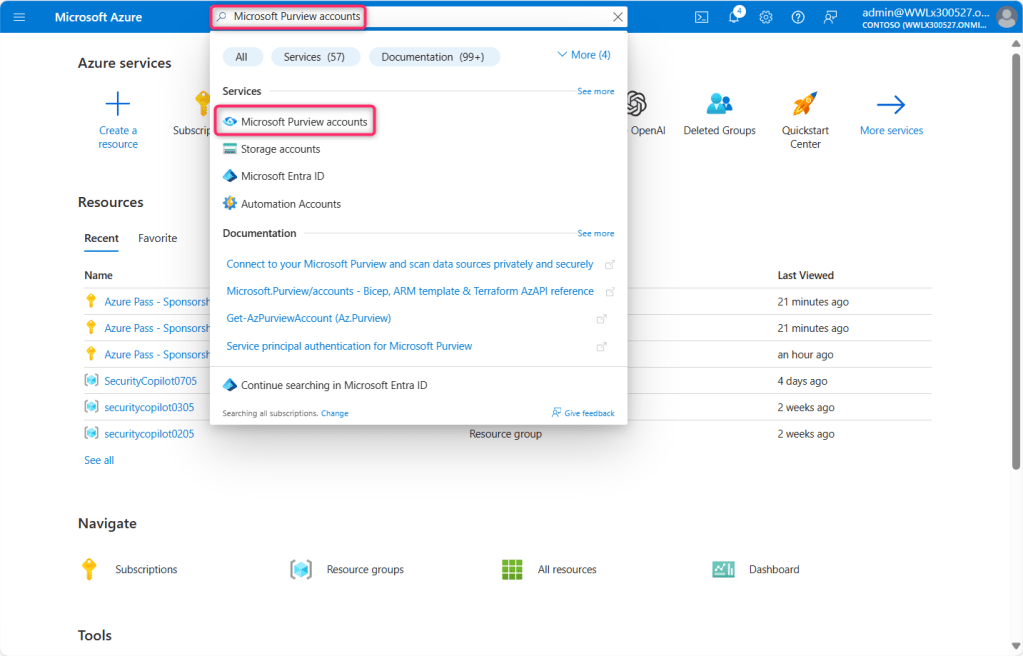
- In Microsoft Azure portal search bar, type Microsoft Purview accounts, then navigate and click on Microsoft Purview accounts under Services.
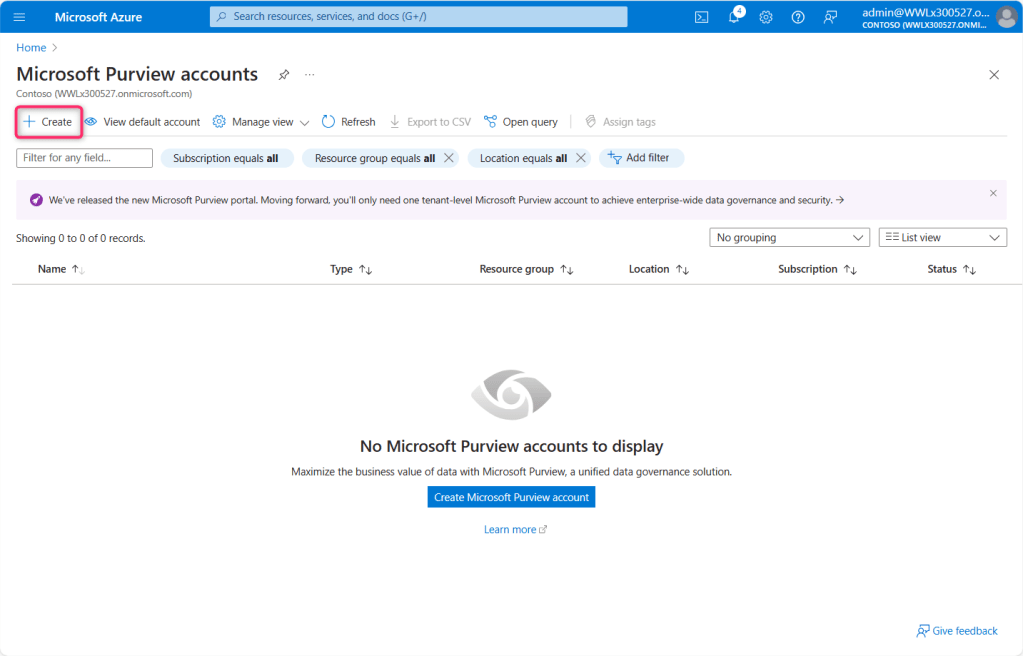
- In the Microsoft Purview accounts page, click on + Create.
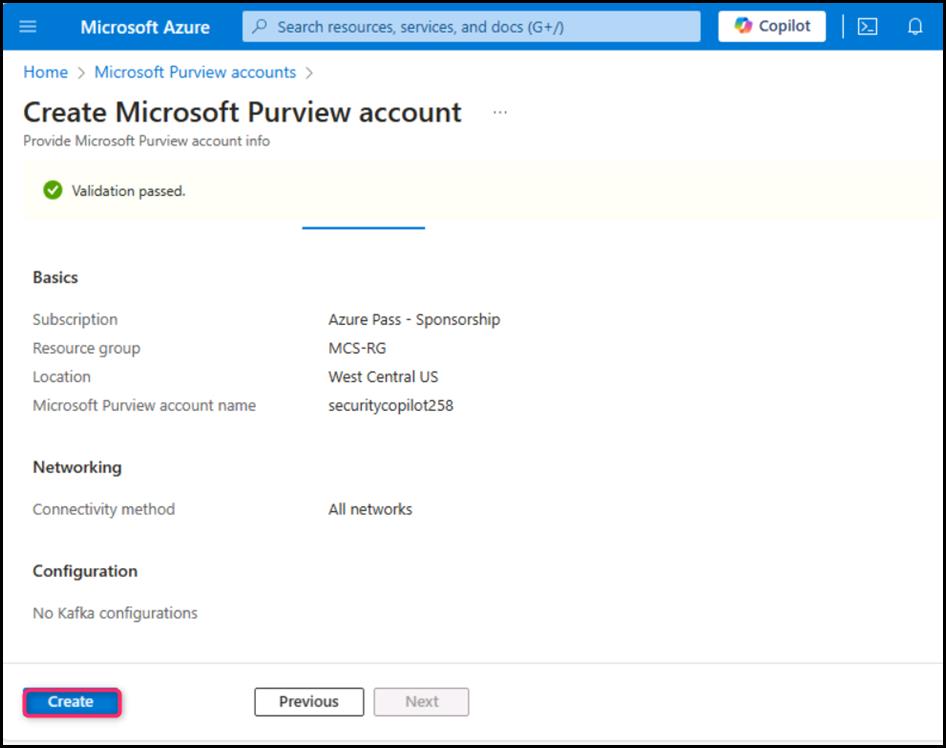
- In the Create Microsoft Purview account page, enter the following details and click on Review + Create button.
| Subscription | Azure Pass |
| Resource group | MCS-RG |
| Microsoft Purview account name | Enter the name of your choice (here, we entered securitycopilot2) |
| Location | West Central US |
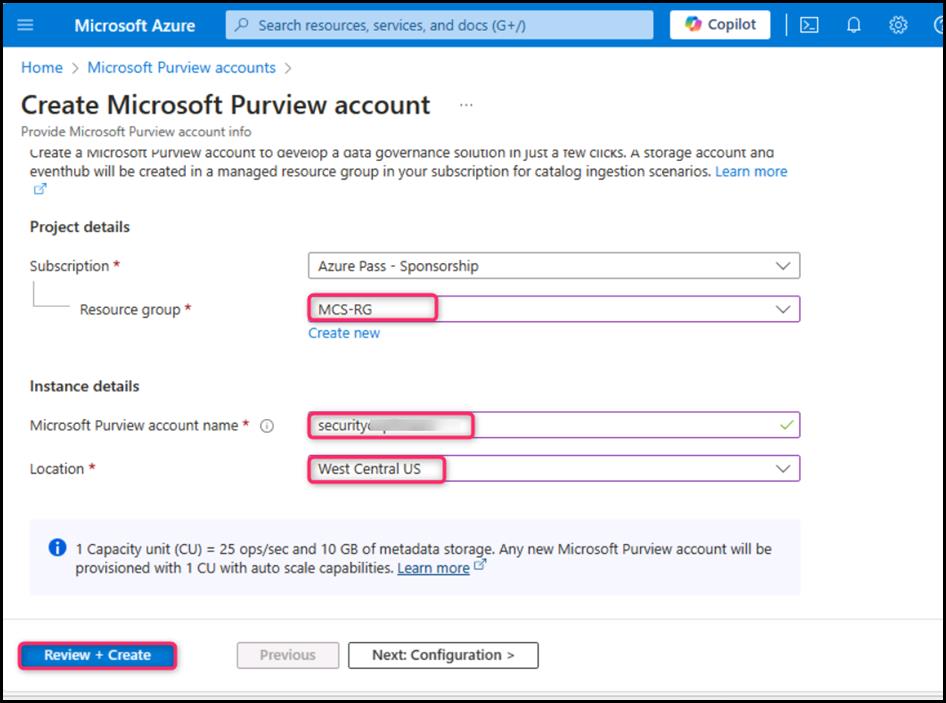
- After validation is passed, click on the Create button.
- Open a new tab in the Edge browser address bar and enter the following URL: https://purview.microsoft.com/. If prompted, then sign in with your O365 tenant credentials. On Welcome to the new Microsoft Purview portal! dialog box, agree to the terms and conditions, then click on the Get started button.

- You’ll be directed to Microsoft Purview portal.

- You’ll be directed to Microsoft Purview portal.

Task 2: Setting Custom DLP policies for Microsoft Copilot for Security
- In the Microsoft Purview portal, navigate to Solutions, then click on Data loss prevention as shown in the below image.
- Click on Policies. In the Policies page, navigate and click on +Create policy.
- In Template or custom policy pane, under Categories, navigate and click on Custom. Under Regulations, click on Custom policy. Then, click on the Next button.
- On Name your DLP policy pane, in the Name field, enter the following name:
Custom Policy for Microsoft Security Copilot, then click on the Next button. - Leave the Assign admin units pane in the default state and click on the Next button.
- On Choose where to apply the policy pane, select the check boxes of Exchange email, Sharepoint sites, OneDrive accounts, Team chat and channel messages, and Devices, then click on the Next button.
- On Define policy settings pane, select the radio button of Create or customize advanced DLP rules and click on the Next button.
- On Customized advanced DLP rules pane, click on + Create rule.
- On the Create rule page, in the Name field, enter Sensitive Information of Credit Card.
- Scroll down to Conditions section and click on +Add condition, then select Content contains as shown in the below image.
- In the Content contains section, leave Group name and Group operator in default state, click on the dropdown beside Add and select Sensitive info types as shown in the below image. In the Sensitive info types pane that appear on the right side, type credit card number in the search bar and press the Enter button. Select Credit Card Number check box, then click on the Add button.
- Scroll down to User notifications section and Turn On the toggle button.
- Scroll down to Incident reports section, select the severity level of the alerts and reports as High.
- Leave all the parameters in the default state and click on the Save button.
- Click on the Next button.
- In the Policy mode pane, select the radio button of Turn the policy on immediately and click on the Next button.
- On Review and finish pane, carefully review the DLP policy, then click on the Submit button.
- The New policy will be created, click on the Done button.
- Navigate and click on Activity explorer, then click on Turn on auditing button as shown in the below image.
Task 3: Creating an alert in Microsoft Teams
- Click on the horizontal dots beside Microsoft Purview, then navigate and click on Teams as shown in the below image.
- In Microsoft Teams search bar, search and select the name of user – Robert Frost.
- Test the DLP policy that you have created using the following Credit Card Type and Credit Card Number. Select the name of the Credit Card along with the number and send that information in team to Robert Frost.
Credit Card Type Credit Card Number
American Express 378282246310005
JCB 3566002020360505
MasterCard 5105105105105100
Visa 4012888888881881 - Enter the following data to trigger the alerts. Similarly, you can enter random information in this format:
Katie Jordan
Credit Card Account number: Visa 45562411537761660
Debit Card Account number: MasterCard 5439683992731720 - In the Data Loss Prevention section, navigate and click on Alerts, you’ll see the Alerts stating – DLP policy match for Teams conversation along with the Severity and Status of the alerts.
Note: Sometimes alert generation can take up to 30-60 minutes.
In case you did not see the alerts, then click on Policies, select Custom Policy for Microsoft Copilot for Security, then click on the Edit icon as shown in the below image.
Navigate to Name > Admin units > Locations > Advanced DLP rules, click on the Edit icon.
Scroll down to User notifications section and turned the toggle On if it is Off, then click on the Save button.
Note: You’ll analyze the alerts generated through the Custom DLP policy using Microsoft Copilot for Security in the upcoming task. As the SCU consume a lot of credits; therefore, to prevent unnecessary credit loss, we’ve moved this task in the next lab.
Summary
In this lab, you’ve set up a Microsoft Purview account, then you’ve configured custom Data Loss Prevention (DLP) policies for Microsoft Copilot for Security, and created alerts in Microsoft Teams to test the effectiveness of these policies. This hands-on exercise has equipped you with valuable skills in data protection and compliance management within Microsoft’s ecosystem, enhancing your understanding of security measures in cloud-based environments.

Leave a comment